


Today we will discuss a deck that is not seen much in the top 8 of Challenges, but appears with a great frequency in the Leagues, always making several 5-0, so I believe it is a great choice for those who want to grind or maybe even enter the leagues for the first time.
It's a deck that doesn't have a huge advantage against any other, but it also leaves nothing to be desired or is massacred against any of the main decks in the format. I have gotten good results with it, in general in the leagues I have a Winrate close to 62%, which in my opinion is a very satisfactory result.
Ad
About the Deck
Affinity has several versions, however today we are talking about the Midrange which has as its main win condition Urza, Lord High Artificer, also counting on Teferi, Time Raveler to avoid being surprised at the attack phase and sometimes using it as a bounce on something relevant from the opponent's battlefield. Particularly, it's the version I'm most comfortable with, as you hardly end up missing land drops, and has plenty of draws, counterspells and creatures.
It's a very solid deck that is sometimes very explosive, and you can win the game quickly, but also manages to make huge constructs on the late-game.

It is now considered a Tier 2, close to the 14th position in relation to the general presence in the Metagame, but as I said before, in the Leagues it is almost always at the top, getting good results. It's also very enjoyable to play, as it has several interactions — but for the same reason it makes you need to train before joining a league, as there are several micro-decisions in it that can lead you to victory or defeat, so it is important to be well-trained before entering a more serious competition.
Although the deck idea seems to be simple, it often ends up being more complex in the late game, especially after casting Urza, Lord High Artificer, which gives you a huge range of options, but for those who are not very familiar with it, end up taking a long time to decide which move to make.
Basically, you want to get your threats on the board as quickly as possible, always gaining some card advantage along the way with cards like Thoughtcast, Ingenious Smith, Thought Monitor — and of course, one of the main pieces of the deck could not be other than Urza's Saga, one of the strongest cards in the entire format.
About the list, with each passing week we end up changing one thing or another, so don't get attached to this list in particular, since we change things as the Metagame shows up. But the base of the deck always remains: try to get the central idea, and you can make some changes according to the Metagame in your city or among your friends.
The current list I'm running is this:
We have 28 artifacts overall, so you can already imagine the potential of a well-placed Urza's Saga. Now imagine if you can put an Urza's Saga on two and an Urza, Lord High Artificer on four, or even three, and still have a backup of Metallic Rebuke. Often the game ends there, there is no time for the opponent to react, it is a deck that is often extremely aggressive.
We have, Esper Sentinel being one of the best one-drop in the format, On turn 2, we have Ingenious Smith that sometimes looks for the land needed for the next turn or a Portable Hole to take that Ragavan, Nimble Pilferer or Ledger Shredder out of the way, not to mention that it easily becomes a Win Condition over time — if not removed soon it can be a threat to the opponent.
Ad
Turn 3 we have the powerful Teferi, Time Raveler who is extremely versatile as he can be defensive or offensive depending on the match. We have a copy of Dispatch to remove that important creature from the opponent that the Portable Hole couldn't handle.
Anyway, it's a super versatile and powerful deck, it has an answer to the main threats from other decks. And because of this versatility it is always a good option in the Metagame, as it will never have a 100% lost match, having a very effective and relevant side plan against several of the main contenders.
Posture and Mulligan
Here we can talk about a critical part of this deck: Game Posture. As it can be a more aggressive deck, but it can also play a little further back with Metallic Rebuke and Portable Hole, it is essential to know when to advance.
Usually against decks that leave the field more exposed you want to advance as much as possible while there is no imminent risk and, in the traditional turn of the opponent's "strong" card, you hold the game, so you don't take that combo and lose the game.
After establishing a reasonable board and already imposing a clock on the opponent, let the game roll and stay in the backup waiting for the opponent to disarm — don't advance in the possibility of taking a sweeper or at a risk of board disadvantage, this tends to be a deck that punishes the most reckless plays. Despite being a strong deck, it is easy to take a combo in 4 or 5 and fail to win the game because of your greed: 1 life is more than enough, as my friend Tiago Fuguete would say.
In matchups against Aggro, you will prioritize using all your mana very well (this goes for any match, but here it is essential. Use all your mana every turn, to maximize your field as quickly as possible and save the removal for opponent's creatures that could thwart your plan of dominating the board). Most of the time you manage to get the advantage due to the deck's powerful card advantage engine.
As for the Keep decision, note if you already suspect your opponent's deck, even on game 1. For example, if you see that you have 80 cards, you already have a high probability of being a deck with more board control, so you need to focus on a more aggressive and active hand.
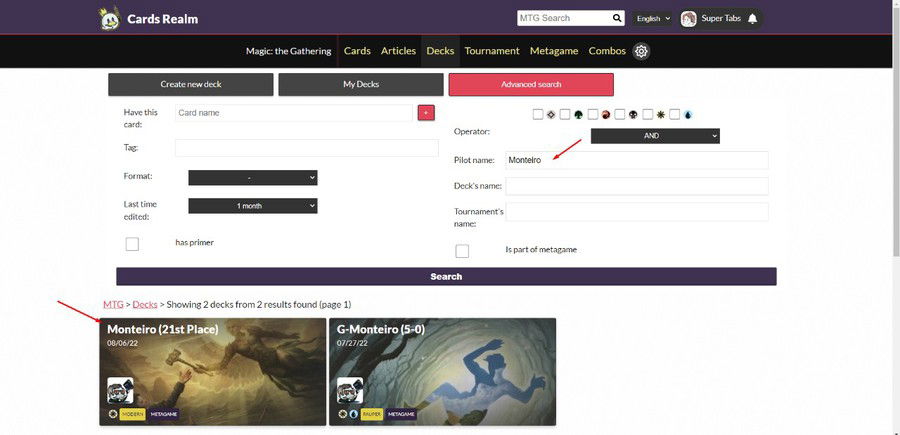
A good option to make this kind of decision before starting the game, if it's on MTGO (Magic Online), you can go to on this Cards Realm page![]() and type the opponent's MTGO player/nick, then you will see which were the last decks that person got any results, which can help you make a good keep decision. This goes for all decks, of course, but this deck specifically, I believe, is a critical part of performing well in championships. Getting as much advance information as possible can be very relevant in a Keep or Mulligan decision.
and type the opponent's MTGO player/nick, then you will see which were the last decks that person got any results, which can help you make a good keep decision. This goes for all decks, of course, but this deck specifically, I believe, is a critical part of performing well in championships. Getting as much advance information as possible can be very relevant in a Keep or Mulligan decision.
As this deck is a Midrange you don't necessarily have a "God Hand" to look for, but a good observation that should always be made is: do I have plays on turn 1, turn 2, turn 3? Do I have the mana for this? What are the possible threats of the opponent in the first turns?
Ad
But I'll put here a hand that always makes me happy and rarely disappoints me throughout the game:
As I said, it's not exactly a "God Hand", but it's a super consistent hand and already with 2 draws easily on the way for 1 or 2 mana most of the time, strong creatures and advantage over the opponent in the first turns.
Against midrange decks it's practically a chess game, where every play can make a difference, and it's in this game that I say it's important to train as much as possible. This is the match where you feel your decisions most impact the game as a whole.
Be careful not to get a counterspell on an important card, work with the Baits, play something not so relevant while the opponent has mana open, and make the most of it when they tap out. Once again, maximizing mana usage is essential.
Play around your opponent's most important cards that will really impact the board; sometimes, spending a Portable Hole on a Ragavan, Nimble Pilferer while having a blocker can be a waste of resources that could be used on another more problematic card in the future.
Sideboard Guide
Murktide
One of the most present decks in the format, and one of the matches that will happen the most.
Murktide fits in the Midrange category, and taking that into consideration, I believe it is a match where we must be cautious not to take a reverse on the board, a counter on a relevant card and end up losing the game due to carelessness.
Cards that your opponent will “always” have, and you need to play around are Unholy Heat, Spell Pierce and Archmage's Charm, which can even take a strong creature already equipped, so give preference to equipping creatures with a cost greater than 1.
Keep in mind that here, every unoptimized play can make you lose the game. Play calmly and carefully, try to think about your opponent's next moves to prevent yourself and play around. Despite being a difficult match, the side plan is more relaxed, since we have already thought about this game on the maindeck.
Side in
Side out
As you can see, the side plan here is to play a little less aggressive, as we have cards to deal with pretty much anything the opponent can cast. Pithing Needle is for the Engineered Explosives that will normally come up against you and can end your game, Mana Leak is for getting the game under your control and surprise them with an unexpected counter, and can give you a turn advantage. As for the Dispatch, save it for a possible Murktide Regent, as you won't be able to exile it with Portable Hole.
When it comes to removing cards, it's a bit complicated because we don't have bad cards in this matchup, but we remove the cards that have a lesser impact on the game due to the opponent's ansers. For example, the Cranial Plating that wins many games, but in this match it is easily circumvented with a 1 mana removal, as it doesn't grant a toughness boost.
Ad
Note: Don't forget that they have a strong card in this match in Instant Speed, Dress Down — play around it if the opponent has two mana open, and you want to attack with your Constructs. Always keep an eye out when the opponent is looking for basic Islands, as it will surely cast Blood Moon and end your Urza's Saga and still can break your manabase. In game 2 remember to get at least one basic land of each type.
Elementals
This is a complicated matchup, but we can get around it through the amount of creatures because normally, they will use the elementals to kill your creatures, which forces them to 2-for-1 themselves on early-game.
Play around Fury mainly in the first turns, and try to get out of its range, so they don't 2-for-2 or 3-for-2 against you, this is one of the most important parts of this match. Also don't give a creature for free if they're on the play, and you cast a /1 creature, they'll definitely cast Wrenn and Six and kill your creature while putting a great planeswalker in play, which will leave them ahead on the rest of the game.
Here, controlling the number of cards in your hand is very important, your plan is to keep more cards in your hand, while adding more threats in play. If you give them an advantage at the beginning of the game as I said in the previous paragraph, you will hardly recover, as the Elementals' late game is too powerful.
Side in
Side out
The plan here is to use Lavinia, Azorius Renegade to avoid the elementals for the first few turns, Pithing Needle against Planeswalkers, and Mana Leak for the bombs.
I choose to remove cards that clearly have no value in the match, like Relic of Progenitus and Aether Spellbomb (since everything has a strong effect when it enters the battlefield, we will hardly have a good time for this play).
The 2 Esper Sentinel usually can't generate as much value and die to Wrenn and Six and the Portable Hole despite not having many valid targets in this matchup, can remove important things like a Chalice of the Void or even Wrenn and Six.
Be careful, as in the post-side some players add Supreme Verdict which easily wins the game and cannot be countered. Play around it, and if the opponent is leaving all their creatures on the field without concern, it is a sign of them attempting to make you overextend and then destroy everything with Supreme Verdict and win the game in a single play.
Living End
Living Eng is a stronger contender in Modern, but I have had good results in this match with this Affinity. We have many weapons against it in the maindeck, like Teferi, Time Raveler that will prevent the cast of Living End through Cascade, we have Relic of Progenitus that may win the game on its own on Game 1, and also Metallic Rebuke. So, I believe that G1 is naturally favorable — however, it's not a free win, since if these cards don't come quickly, Living End can win without giving us a chance.
Ad
From Game 2 onwards, the game complicates as they have compelling hate pieces against us, like Force of Vigor, Foundation Breaker and some even add Mystical Dispute, so we have to play cautiously, or we lose the game too easily.
Side in
Side out
Note that I choose to keep the Sword of Fire and Ice - Despite being a bit slow, I've won several games because of it, most of the most relevant creatures in Living End are blue, so as I'll play with many hates against them, the chance that I have this time to cast and equip is great.
Lavinia, Azorius Renegade gives us a lot of time, as the opponent only deals with it with the Brazen Borrower in the pass or directly trying to counter it, so if your starting hand has a copy of her, it's almost always a keep.
Meddling Mage 99% of the time will name Living End, but in some rare cases you can name a Force of Vigor for example, if you have enough counters to make sure you can respond to a Living End with a Force of Negation backup.
An important detail: sometimes the opponent decides to cast Living End rushing with few creatures in their grave, then you can take advantage of that and grow the field to the point of facing their creatures, thus reducing their options. Remember that your Constructs can get huge and even more equipped with a Sword of Fire and Ice or Shadowspear, so you can win the race!
Hammer Time
Here we have a tough matchup. We have some interactions that can define the game, Portable Hole is one of your main weapons against Hammer and in fact should be used against Colossus Hammer, so, if they go to Urza's Saga plan, your Constructs tend to get bigger compared to theirs. Remember to use the Portable Hole wisely, it can even be used on the Kaldra Compleat's Germ token, which will greatly hinder your opponent.
Watch out for the UW versions that might have Spell Pierce on Maindeck, and the Mono White versions that can have Mana Tithe post-side. If they're not pushing you to lethal, don't make your best play without making sure the opponent doesn't have a counter, or you have a backup Metallic Rebuke. Also watch out for Inkmoth Nexus due to its constant lethal threat, so leave the Dispatch reserved for it.
Side in
Side out
The cards you will want to see in your starting hand are much more to stop their game than to advance yours, as if both of you have good hands to advance, they win faster. However, you will have many reactive cards that will make your opponent miss the initial combo, thus giving you time to stabilize the board and win in the mid or late game.
Ad
For that reason, we chose to remove heavier cards from the deck and focus on early removals. Another card that can win the game on its own is Hurkyl's Recall, save it for the last moment, get the most value out of it. When you do this, you usually leave the opponent in a situation where they can't get back into the game, especially if they went to the Construct plan.
Burn
A game very close to 50/50 for most people, you have many interactions, and you can press enough for the opponent to be in a defensive stance with their creatures, only being able to damage you with spells in their hands. Arriving in this situation, you should try to save the counterspells for the most relevant damage and go to the race. If you have Urza's Saga, finding Shadowspear is your absolute priority, as it is almost a guarantee of your victory, especially in Game 1, where the opponent still won't have answers.
Eidolon of the Great Revel is a double-edged knife here. Know how to take advantage of this situation to play more defensively by creating Constructs, casting spells with the highest value like Urza, Lord High Artificer and Thought Monitor, and then the opponent can end up with very low life and lose the race without even realizing it.
On the side, the opponent will most like add 3 or even 4 Smash to Smithereens, sometimes Deflecting Palm and some even add Roiling Vortex.
Side in
Side out
Post-side, you should always play around Smash to Smithereens. For this, you will have 5 counterspells, normally being more than enough.
Control the number of cards in your opponent's hand, as we know, Burn has a hard time keeping up after they run out of gas - keep an eye on the number of cards in their hand and your own amount of life. Creature trades are usually more favorable for you as we have a much higher Card Advantage than Burn.
We can also be an explosive deck and go all out to race, so in your starting hand, you can predict whether you will go for a more aggressive game or if you will try to control their plan — on turn 3 or 4 you will already know if you can finish the race before them or if you can stretch the game to later turns. This type of situation is a little more complex to explain, this is a game where you get better with experience.
I have a Winrate rate of 60% in this match, so I consider it a Good Match, but as I said before, it's a match where every detail counts. Be careful with your life total, but you should avoid chump blocking for nothing, your creatures can get bigger than theirs quickly, although sometimes this is necessary.
Conclusion
That's basically it, folks! This is a deck where the player counts a lot, not just any player makes good results — as I said, it has several micro-decisions that strongly interfere in the matches, you must train a lot until you feel confident and grasp the deck's domain.
Ad
Any questions I'm available, just post it in the comments or call me on Twitter / MTGO. Thank you very much for your attention, and until next time!


— Comments0
Be the first to comment